标签搜索


找到
5
篇与
相关的结果
-
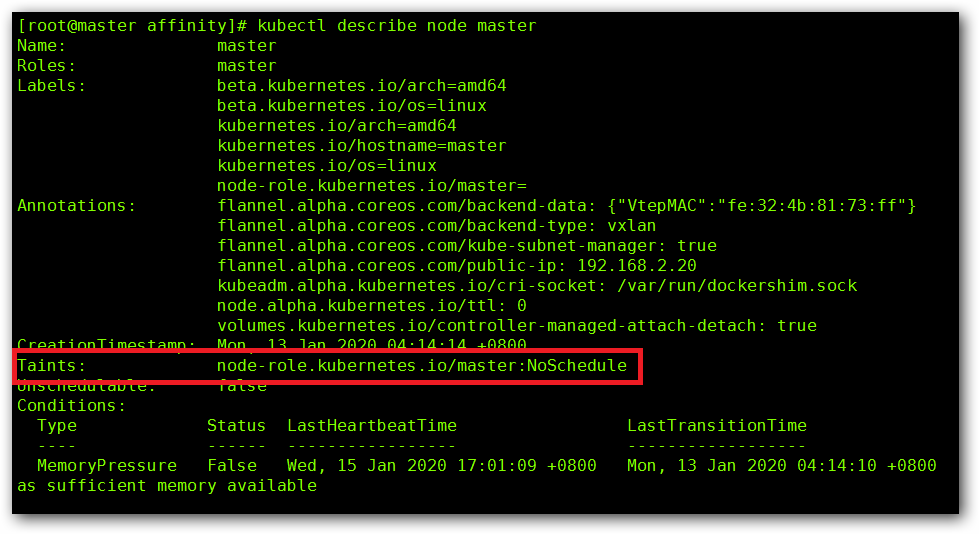
 Kubernetes的污点和容忍 一、Taint 和 Toleration介绍节点亲和性,是 pod 的一种属性(偏好或硬性要求),它使 pod 被吸引到一类特定的节点。Taint 则相反,它使节点能够排斥一类特定的pod,Taint 和 toleration 相互配合,可以用来避免 pod 被分配到不合适的节点上。每个节点上都可以应用一个或多个taint ,这表示对于那些不能容忍这些 taint 的 pod,是不会被该节点接受的。如果将 toleration 应用于 pod上,则表示这些 pod 可以(但不要求)被调度到具有匹配 taint 的节点上。二、污点(Taint)2.1、 污点 ( Taint ) 的组成使用 kubectl taint 命令可以给某个Node节点设置污点,Node 被设置上污点之后就和 Pod 之间存在了一种相斥的关系,可以让 Node 拒绝 Pod 的调度执行,甚至将 Node 已经存在的 Pod 驱逐出去。污点的对象是: 节点每个污点的组成: key=value:effect每个污点有一个 key 和 value 作为污点的标签,其中 value 可以为空,effect 描述污点的作用。当前 taint effect 支持如下三个选项:NoSchedule :表示 k8s 将不会将 Pod 调度到具有该污点的 Node 上。PreferNoSchedule :表示 k8s 将尽量避免将 Pod 调度到具有该污点的 Node 上。NoExecute :表示 k8s 将不会将 Pod 调度到具有该污点的 Node 上,同时会将 Node 上已经存在的 Pod 驱逐出去。我们的 Master 节点上本来就已经有了污点,所以我们在创建 Pod 的时候,才不会将 Pod 创建在 Master 节点上。2.2、污点的设置、查看和去除设置污点kubectl taint nodes node1 key1=value1:NoSchedule这里我们打了一个 NoExecute 的标签,这个时候我们可以看到,之前在 node-1 上的 Pod 已经被驱离,因为这是自助式的 Pod ,没有我们的资源管理器进行管理的 Pod ,所以被驱离以后没有在被创建出来。节点说明中,查找 Taints 字段kubectl describe pod pod-name去除污点kubectl taint nodes node1 key1:NoSchedule-三、容忍(Tolerations)设置了污点的 Node 将根据 taint 的 effect:NoSchedule、PreferNoSchedule、NoExecute 和 Pod 之间产生互斥的关系,Pod 将在一定程度上不会被调度到 Node 上。 但我们可以在 Pod 上设置容忍 ( Toleration ) ,意思是设置了容忍的 Pod 将可以容忍污点的存在,可以被调度到存在污点的 Node 上。容忍的对象是: pod比如,我们现在将 node-1 与 node-2 都标记上污点,这个时候我们来创建一个 Pod 看一下:pod.spec.tolerationstolerations: - key: "key1" operator: "Equal" value: "value1" effect: "NoSchedule" tolerationSeconds: 3600 # 其中 key, vaule, effect 要与 Node 上设置的 taint 保持一致 # operator 的值为 Exists 将会忽略 value 值 # tolerationSeconds 用于描述当 Pod 需要被驱逐时可以在 node 上继续保留运行的时间 # 1、当不指定 key 值时,表示容忍所有的污点 key: tolerations: - operator: "Exists" # 2、当不指定 effect 值时,表示容忍所有的污点作用 tolerations: - key: "key" operator: "Exists" # 3、有多个 Master 存在时,防止资源浪费,可以如下设置 kubectl taint nodes Node-Name node-role.kubernetes.io/master=:PreferNoSchedule这个时候我们来设置一下,看下效果:vim tole-pod.yaml apiVersion: v1 kind: Pod metadata: name: pod-1 labels: app: pod-1 spec: containers: - name: pod-1 image: docker.io/busybox command: [ "/bin/sh", "-c", "sleep 600s" ] tolerations: - key: "node" operator: "Equal" value: "zutuaxue" effect: "NoExecute" tolerationSeconds: 30 # 容忍时间,超过该时间后将其驱离
 -
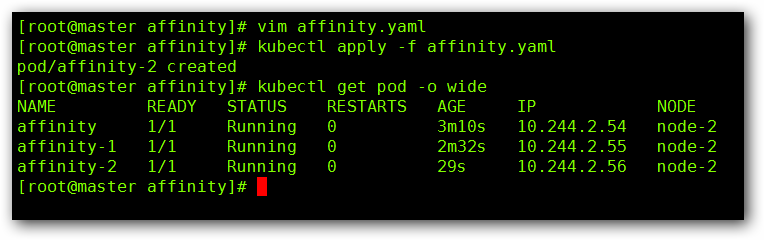
Kubernetes节点与 Pod 亲和性 一、节点亲和性策略介绍pod.spec.nodeAffinitypreferredDuringSchedulingIgnoredDuringExecution:软策略requiredDuringSchedulingIgnoredDuringExecution:硬策略preferred:首选,较喜欢 required:需要,必修键值运算关系:In:label 的值在某个列表中NotIn:label 的值不在某个列表中Gt:label 的值大于某个值Lt:label 的值小于某个值Exists:某个 label 存在DoesNotExist:某个 label 不存在二、节点与Pod硬亲和性requiredDuringSchedulingIgnoredDuringExecution#创建pod的模板yaml文件 vim affinity.yaml apiVersion: v1 kind: Pod metadata: name: affinity labels: app: node-affinity-pod spec: containers: - name: with-node-affinity image: docker.io/nginx affinity: nodeAffinity: requiredDuringSchedulingIgnoredDuringExecution: nodeSelectorTerms: - matchExpressions: - key: kubernetes.io/hostname operator: NotIn values: - node-1通过修改 Pod 名称的方式多创建几个 Pod 查看结果:这个时候,我们将 operator 修改为 “In” ,node-1 修改为 node-3,vim affinity.yaml apiVersion: v1 kind: Pod metadata: name: affinity-3 labels: app: node-affinity-pod spec: containers: - name: with-node-affinity image: docker.io/nginx affinity: nodeAffinity: requiredDuringSchedulingIgnoredDuringExecution: nodeSelectorTerms: - matchExpressions: - key: kubernetes.io/hostname operator: In values: - node-3查看下结果:这个时候可以看到,我们新创建的 Pod 一直处于 Pending 的状态,这是因为我们没有Node-3这个节点,且采用的是硬亲和性策略的原因所导致的。三、节点与Pod软亲和性preferredDuringSchedulingIgnoredDuringExecution为了解决上述因为硬亲和性创建Pod不成功的问题,我们通过设置软亲和性策略后再次创建一个pod affinity-pod-a测试。vim affinity-1.yaml apiVersion: v1 kind: Pod metadata: name: affinity-a labels: app: node-affinity-pod-a spec: containers: - name: with-node-affinity-a image: docker.io/nginx affinity: nodeAffinity: preferredDuringSchedulingIgnoredDuringExecution: - weight: 1 preference: matchExpressions: - key: kubernetes.io/hostname operator: In values: - node-3我们没有 node-3 节点,这个时候我们创建看一下:我们再将 node-3 修改为 node-1 看一下:通过实验我们得出关于节点与pod亲和力策略硬限制是:我必须在某个节点或我必须不在某个节点。软限制是:我想在某个节点或我不想在某个节点,实在不行,我也可以将就。软硬限制结合策略策略优先级:先满足硬限制,然后满足软限制软硬限制可以结合使用,先满足硬限制,然后满足软限制= apiVersion: v1 kind: Pod metadata: name: affinity labels: app: node-affinity-pod spec: containers: - name: with-node-affinity image: docker.io/nginx affinity: nodeAffinity: requiredDuringSchedulingIgnoredDuringExecution: nodeSelectorTerms: - matchExpressions: - key: kubernetes.io/hostname operator: NotIn values: - node-2 preferredDuringSchedulingIgnoredDuringExecution: - weight: 1 preference: matchExpressions: - key: source operator: In values: - zutuanxue_com四、Pod 亲和性pod.spec.affinity.podAffinity/podAntiAffinitypreferredDuringSchedulingIgnoredDuringExecution:软策略requiredDuringSchedulingIgnoredDuringExecution:硬策略podAffinity: pod之间亲和,pod在同一网段 podAntiAffinity:pod之间反亲和,pod在不同网段4.1、pod亲和性vim test-pod.yaml apiVersion: v1 kind: Pod metadata: name: pod-1 labels: app: pod-1 spec: containers: - name: pod-1 image: docker.io/busybox command: [ "/bin/sh", "-c", "sleep 600s" ] #-----------------------------# 分割线 #--------------------------------------# vim affinity-pod.yaml apiVersion: v1 kind: Pod metadata: name: pod-3 labels: app: pod-3 spec: containers: - name: pod-3 image: docker.io/nginx affinity: podAffinity: requiredDuringSchedulingIgnoredDuringExecution: - labelSelector: matchExpressions: - key: app operator: In values: - pod-1 topologyKey: kubernetes.io/hostname我们来看一下结果:五、关于亲和性总结调度策略匹配标签操作符拓扑域支持调度目标nodeAffinity主机In, NotIn, Exists,DoesNotExist, Gt, Lt否指定主机podAffinityPODIn, NotIn, Exists,DoesNotExist是POD与指定POD同一拓扑域podAnitAffinityPODIn, NotIn, Exists,DoesNotExist是POD与指定POD不在同一拓扑域
-
istio分布式追踪与可视化 一、istio分布式追踪官方网站:https://www.jaegertracing.io/修改 tracing 的 svc 模式由 ClusterIP 为 NodePort kubectl edit svc tracing -n istio-system 查看 tracing 的端口 kubectl get svc -n istio-system 通过浏览器进行访问 http://IP:PORT/jaeger二、 网络可视化首先,定义要用作 Kiali 用户名和密码的凭据。 KIALI_USERNAME=$(read -p 'Kiali Username: ' uval && echo -n $uval | base64) 当提示出现时输入 Kiali 用户名: KIALI_PASSPHRASE=$(read -sp 'Kiali Passphrase: ' pval && echo -n $pval | base64) 当提示出现时输入 Kiali 密码: 运行以下命令创建 secret: NAMESPACE=istio-system cat <<EOF | kubectl apply -f - apiVersion: v1 kind: Secret metadata: name: kiali namespace: $NAMESPACE labels: app: kiali type: Opaque data: username: $KIALI_USERNAME passphrase: $KIALI_PASSPHRASE EOF 修改 kiali 的 svc 模式由 ClusterIP 为 NodePort kubectl edit svc kiali -n istio-system 查看 kiali 的端口 kubectl get svc -n istio-system 通过浏览器进行访问 http://IP:PORT
-
Gitlab备份与还原 由于gitlab中存放的都是开发人员的工作成果,所以为了保证数据安全,我们会定期对数据进行备份,对gitlab进行备份将会创建一个包含所有库和附件的归档文件。对备份的恢复只能恢复到与备份时的gitlab相同的版本。将gitlab迁移到另一台服务器上的最佳方法就是通过备份和还原。gitlab提供了一个简单的命令行来备份整个gitlab ,并且能灵活的满足需求。一、备份备份路径:备份文件将保存在配置文件中定义的backup_path中 ,文件名为TIMESTAMP_gitlab_backup.tar,TIMESTAMP为备份时的时间戳。TIMESTAMP的格式为 :EPOCH_YYYY_MM_DD_Gitlab‐version。备份配置:[root@zutuanxue git_data]# vim /etc/gitlab/gitlab.rb gitlab_rails['backup_path'] = "/opt/backups" #备份路径 gitlab_rails['backup_keep_time'] = 604800 #备份周期-秒(7x24x3600) [root@zutuanxue git_data]# gitlab-ctl reconfigure手动备份:[root@zutuanxue git_data]# gitlab-backup create 或者 [root@zutuanxue git_data]# gitlab-rake gitlab:backup:create [root@zutuanxue git_data]# ls /opt/backups/定时备份:在定时任务里添加:0 2 * * * /opt/gitlab/bin/gitlab-rake gitlab:backup:create 或 0 2 * * * /opt/gitlab/bin/gitlab-backup create二、还原操作只能还原到与备份文件相同的gitlab版本。执行恢复操作时,需要gitlab处于运行状态,备份文件位于gitlab_rails[‘backup_path’]。需要先停掉两个服务,停止连接到数据库的进程(也就是停止数据写入服务,如果是空主机,没有任何操作的话,可以不停止服务,停止相应服务的目的是为了保证数据移植),但是保持GitLab是运行的。在web中删除项目[root@zutuanxue backups]# gitlab-ctl stop unicorn [root@zutuanxue backups]# gitlab-ctl stop sidekiq指定时间戳你要从那个备份恢复:[root@zutuanxue git_data]# cd /opt/backups/ [root@zutuanxue backups]# gitlab-ctl stop unicorn ok: down: unicorn: 0s, normally up [root@zutuanxue backups]# gitlab-ctl stop sidekiq ok: down: sidekiq: 1s, normally up [root@zutuanxue backups]# gitlab-rake gitlab:backup:restore BACKUP=1586328114_2020_04_08_12.9.2 (有的版本执行gitlab-rake gitlab:backup:restore BACKUP=1586328114即可) Unpacking backup ... done Before restoring the database, we will remove all existing tables to avoid future upgrade problems. Be aware that if you have custom tables in the GitLab database these tables and all data will be removed. Do you want to continue (yes/no)? yes #提示移除所有存在的表 . . . This task will now rebuild the authorized_keys file. You will lose any data stored in the authorized_keys file. Do you want to continue (yes/no)? yes #提示移除所有验证秘钥 [root@zutuanxue backups]# gitlab-ctl restart#重启gitlab 注意:也可使用gitlab-rake gitlab:check SANITIZE=true验证下gitlab服务浏览器重新打开gitlab页面,重新登录后查看到被还原的项目内容
-
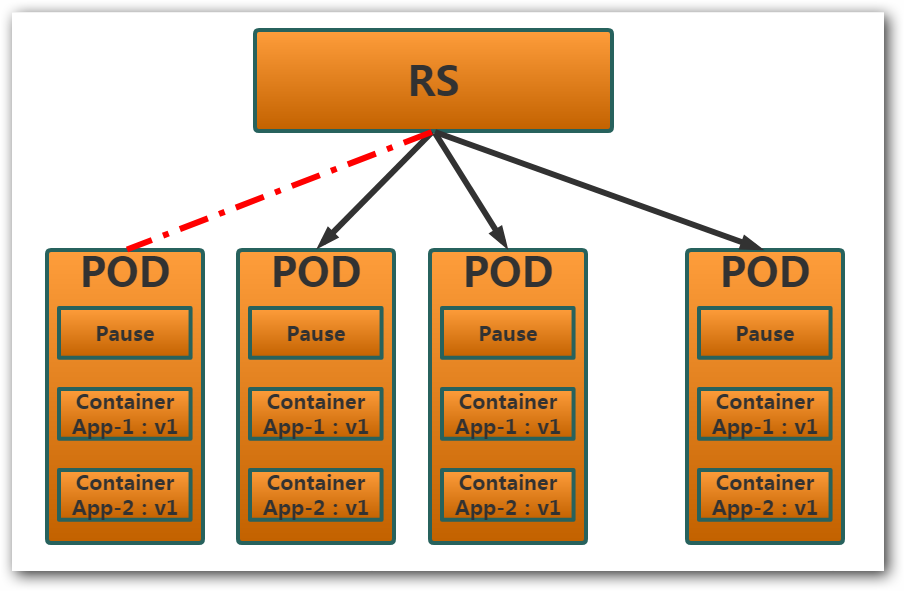
资源控制器之RS RC (ReplicationController )主要的作用就是用来确保容器应用的副本数始终保持在用户定义的副本数 。即如果有容器异常退出,会自动创建新的 Pod 来替代;而如果异常多出来的容器也会自动回收(已经成为过去时)。Kubernetes 官方建议使用 RS(ReplicaSet ) 替代 RC (ReplicationController ) 进行部署,RS 跟 RC 没有本质的不同,只是名字不一样,并且 RS 支持集合式的 selector。RS 用示例:vim rs.yaml apiVersion: apps/v1 kind: ReplicaSet metadata: name: myweb spec: replicas: 3 selector: matchLabels: tier: myweb template: metadata: labels: tier: myweb spec: containers: - name: nginx image: docker.io/nginx imagePullPolicy: IfNotPresent ports: - containerPort: 80我们来查看下我们的 Pod 信息:这个时候我们来随便删除一个其中的 Pod 后在查看下我们的 Pod 信息:通过上述操作,我们可以看到,当我们定义了一个 RS 控制器的副本数目为 3 以后,那么,系统会始终保持我们的副本数为,不管是多了还是少了,系统始终会保持我们的副本数量与我们定义的数量一致(多删少建)。这个时候我们可以通过 kubectl get pod --show-labels 来查看我们 Pod 的标签:这个时候可以看到我们在 rs.yanl 文件内所定义的标签,这个时候,我们来通过命令 kubectl label pod myweb-rkqjz tier=my-nginx --overwrite=True 修改我们 myweb-rkqjz 这个Pod 的标签然后看下效果:这个时候我们需要注意一下“error: 'tier' already has a value (myweb), and --overwrite is false“ 因为标签已经存在,所以后面需要接上 --overwrite=True 才能修改,我们的标签,但是修改玩以后,因为 RS 是通过 Pod 的标签来确定哪些 Pod 是我管理的, 哪些 Pod 不是我管理的,当我们修改了其中一个 Pod 的标签以后,RS 发现我所管理的 Pod 数量与副本定义数量不符,所以会创建一个新的 Pod 来补足,这也就是为什么,当使用删除 RS 的命令 kubectl delete rs --all 以后,会有一个 Pod 没有被删除,因为该 Pod 标签与 rs.yaml 内定义的标签不符,所以不归该 RS 管理器管辖。